Usaha di bidang souvenir masih sangat menjanjikan ,seperti souvenir penikahan,kado,ulang tahun dan lainya.
Akan tetapi di sebagian orang masih bingung untuk memulai sebuah usaha. Mau usaha apa yah saya ini ?.
Sering mereka tidak menyadarinya bahwa lima menit perjalanan dari rumah ada toko kain,toko kertas bahkan bisa jadi di gudang belakang rumah ada setumpuk kain yang sudah tidak terpakai,
Lho apa hubunganya sama usaha?.Maksud saya begini jika Anda bingung akan memulai usaha apa sedangkan di sebelah ada sebuah toko yang menjual kain-kain dan kertas bekas kenapa tidak memanfaatkanya,kain bekas tentu untuk percobaan dulu dengan menggunakan kain baru akan lebih baik.
Wah makin bingung inih?
Begini maksud saya, manfaatkanlah kain tersebut untuk membuat souvenir, soal ide itu gampang Anda bisa menemukan panduanya diluar atau disini. Maksud khan ??.
Panduan membuat souvenir contoh nya seperti ini, langsung saja yah di perhatikan ;
Membuat souvenir burung unik lentik dan cantik

You will need:

Keep the pin in and sew up the open side using matching, doubled thread, in over stitch. Don't sew up the straight edge, this is the bottom of the body, where the stuffing goes in.
I'm using blue thread so that you can see what I'm doing.

Tie a knot at the top by going under a stitch with your needle before the stitch is pulled flat. Like this:

Stuff the body full of stuffing. You can use cotton wool if you don't have toy stuffing.

Draw around the bottom of the body on the remainder of your body part felt. Draw it in the corner as you'll need the rest of the felt later on. Cut out the circle you've drawn.

Pop it on to the round end of the body like a lid, if it doesn't fit, give it a trim.
Start to sew the circle on to the body like in the picture below:
Before you get all the way around, push the two pence piece inside. Then sew up the gap.


Step 2.
Features.
Fold a piece of beak coloured felt in half and pin the layers together. Cut out a beaky shape a bit like mine below.
It doesn't have to be any particular size or shape, you can make it however you like, it's your bird. I used the fold in the felt as part of the beak, it cuts down the amount of sewing and looks neater on the top of the beak. You'll see what I mean in a minute or two.

Sew around the open edges of the beak with over stitch, but not the bottom flat end. Leave that open so it can be stuffed and fitted to your bird's face.

Stuff the beak. You might need to use a pencil to get in to the beaky point.

Pop the beak over the end of the bird's face like in the picture below. See how using the fold of the felt as part of the beak makes the top of the beak look nice and neat? The stitches are mostly on the underside.
To secure the beak, sew through the beak and face going all the way through to the other side. Side view:


Try and keep your stitches small so that they don't stand out too much. It should look something like this:

He needs more features.
Cut out two wings, two feet, two white eye circles and two yellow eye circles. You can make these whatever size you think will suit your bird. You could make extra big wings if you think your bird might like to fly a long way. Make big feet if he'd rather walk.
The white eye circles need to be a little bit smaller than the yellow ones.

Cut a hole in the middle of the yellow eye circles. To do this, fold the circle in half and cut a small semi circle shape out of the folded side of the circle.

Cut some feathery slits in the wings.


Glue the white eye circles on to either side of the bird. If you want him to look extra inquisitive, glue one white eye circle slightly lower down than the one on the other side.

Glue on the yellow eye circles over the white ones so that the bead peeps out like in the picture below.
Glue on the wings with just a dot of glue in the top corner so that he can still flap.

Glue the feet on the underside of the body like this:

Poke the end of the feather in between the stitches on top of the bird's head.
You can put a bit of glue on the tip of the feather if you think it might fall out. Mine didn't need it though.

Akan tetapi di sebagian orang masih bingung untuk memulai sebuah usaha. Mau usaha apa yah saya ini ?.
Sering mereka tidak menyadarinya bahwa lima menit perjalanan dari rumah ada toko kain,toko kertas bahkan bisa jadi di gudang belakang rumah ada setumpuk kain yang sudah tidak terpakai,
Lho apa hubunganya sama usaha?.Maksud saya begini jika Anda bingung akan memulai usaha apa sedangkan di sebelah ada sebuah toko yang menjual kain-kain dan kertas bekas kenapa tidak memanfaatkanya,kain bekas tentu untuk percobaan dulu dengan menggunakan kain baru akan lebih baik.
Wah makin bingung inih?
Begini maksud saya, manfaatkanlah kain tersebut untuk membuat souvenir, soal ide itu gampang Anda bisa menemukan panduanya diluar atau disini. Maksud khan ??.
Panduan membuat souvenir contoh nya seperti ini, langsung saja yah di perhatikan ;
Membuat souvenir burung unik lentik dan cantik
You will need:

Some felt for body parts, about 20cm by 10cm.
Some different coloured felt for his feet and beak.
Thread to match your felt.
A small bit of white felt.
A feather.
A two pence piece. Make sure it's OK that you keep the two pence, it's going inside the bird.
Two tiny beads.
Scissors.
A pencil.
Glue.
A needle.
A few pins.
Oh, and some stuffing (not pictured).
Step 1.
The body.
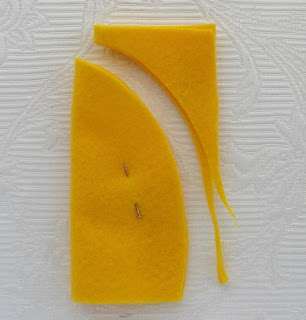
Using about half of the body part felt, fold it in half and pin the layers together. Cut this curved line on the open side to make the body shape. It doesn't have to be exactly like mine, just make sure you don't cut the folded side

Keep the pin in and sew up the open side using matching, doubled thread, in over stitch. Don't sew up the straight edge, this is the bottom of the body, where the stuffing goes in.
I'm using blue thread so that you can see what I'm doing.

Tie a knot at the top by going under a stitch with your needle before the stitch is pulled flat. Like this:

Stuff the body full of stuffing. You can use cotton wool if you don't have toy stuffing.

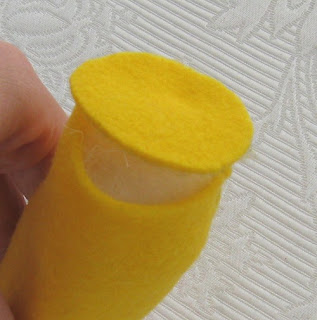
Draw around the bottom of the body on the remainder of your body part felt. Draw it in the corner as you'll need the rest of the felt later on. Cut out the circle you've drawn.

Pop it on to the round end of the body like a lid, if it doesn't fit, give it a trim.

Start to sew the circle on to the body like in the picture below:
Before you get all the way around, push the two pence piece inside. Then sew up the gap.


Step 2.
Features.
Fold a piece of beak coloured felt in half and pin the layers together. Cut out a beaky shape a bit like mine below.
It doesn't have to be any particular size or shape, you can make it however you like, it's your bird. I used the fold in the felt as part of the beak, it cuts down the amount of sewing and looks neater on the top of the beak. You'll see what I mean in a minute or two.

Sew around the open edges of the beak with over stitch, but not the bottom flat end. Leave that open so it can be stuffed and fitted to your bird's face.

Stuff the beak. You might need to use a pencil to get in to the beaky point.

Pop the beak over the end of the bird's face like in the picture below. See how using the fold of the felt as part of the beak makes the top of the beak look nice and neat? The stitches are mostly on the underside.
To secure the beak, sew through the beak and face going all the way through to the other side. Side view:

Back view:

Try and keep your stitches small so that they don't stand out too much. It should look something like this:

He needs more features.
Cut out two wings, two feet, two white eye circles and two yellow eye circles. You can make these whatever size you think will suit your bird. You could make extra big wings if you think your bird might like to fly a long way. Make big feet if he'd rather walk.
The white eye circles need to be a little bit smaller than the yellow ones.

Cut a hole in the middle of the yellow eye circles. To do this, fold the circle in half and cut a small semi circle shape out of the folded side of the circle.

Cut some feathery slits in the wings.

Sew one bead in to the centre of each white eye circle.

Glue the white eye circles on to either side of the bird. If you want him to look extra inquisitive, glue one white eye circle slightly lower down than the one on the other side.

Glue on the yellow eye circles over the white ones so that the bead peeps out like in the picture below.
Glue on the wings with just a dot of glue in the top corner so that he can still flap.

Glue the feet on the underside of the body like this:

Poke the end of the feather in between the stitches on top of the bird's head.
You can put a bit of glue on the tip of the feather if you think it might fall out. Mine didn't need it though.

Mudah khan cara membuatnya, Sekarang Anda tidak usah bingung lagi memulai usaha apa, Anda bisa memanfaatkan kain untuk membuat souvenir dan jadilah.
Anda bisa mengembangkan usaha mudah souvenir seperti ini.Panduan disini hanya sedikit contoh saja yah?
Apabila Anda bisa membuat souvenir yang unik dan mempunyai ciri khas tersendiri saya yakin dalam sebulan kedepan banyak orang yang membutuhkan orang seperti Anda.
Maksud saya banyak orang yang memesan hasil karya Anda
Dalam dua bulan kedepan Anda akan kebanjiran order
dan bersiap-siaplah di panggil bos souvenir, he he.
Kunjungi cara membuat souvenir, cara membuat perhiasan,clay polymer,cara membuat baju dan bagaiman cara lainya di panduan yang lebih lengkap Klik disini
Ok selamat memulai usaha baru Anda semoga sukses selalu.


