Mendapat souvenir ketika menhadiri pesta pernikahan rekan ? Saya sering mengalami ini dan mungkin teman-teman banyak mengalami hal serupa seperti saya, Bagaiman rasanya? sangat senang sekali ?.
Bahkan souvenir 7 tahun lalu masih tersimpan dengan baik di lemari ruang tamu saya.
Souvenir pernikahan biasanya mempunyai keunikan sendiri, dan jarang sekali menemukan bentuk yang sama antara souvenir yang satu dengan lainnya.
Berikut adalah panduan membuat souvenir yang mungkin bisa di jadikan sebagai hadiah di pernikahan atau pesta ulang tahun Anda.
very beautiful. Ok let's get started

Anda bisa memilih warna yang Anda suka dengan selera sendiri, Kuning dan hijau lebih saya sukai, baiklah mari kita siamak panduan ini sangat mudah sekali kok saya yakin Anda akan bisa cepat menguasainya.
Cukup dengan melihat panduan bergambar ini Anda akan membuat souvenir cantik hasil karya sendiri.
You will need:
About 14cm by 20cm of felt for the body, any colour you like.
A small piece of white felt.
An even smaller piece of beak coloured felt, any colour you like.
Thread to match your body and beak felt.
Some stuffing, I have wadding here but you can use anything, fabric scraps or cotton wool balls.
Scissors.
Craft glue.
A ruler (I'm beginning to think rulers are quite handy after all).
A needle.
A pin.
A penny.
A two pence piece.
A pencil.
A scrap of paper.
Two teeny beads.
Read through all of the instructions first, then you'll know what you're doing.
Step 1.
We're going to use a paper pattern to help get the right shape, don't worry it's easy.
Measure and draw an 8cm by 3cm rectangle on your paper, I'm using green paper so that you can see it against the white background, it doesn't matter what colour you use.
Cut out the rectangle, then fold it along the lines I have drawn, so it ends up like mine in the picture here.
Making sure the folds are at the bottom and at the left. Draw a curve like mine and cut along your line, it should be a pointy oval shape when you open it out.
Step 2.
Now it's time to draw around shapes and cut them out. You need 5 of the oval shape you made, these are the body pieces.
See how I've squashed them up at one side? That saves materials, good for the planet and good for you as you might have enough left to make another Chick-a-Dee.
Draw around your penny and your two pence twice each like I have. These are the eye circles. Use some of the left over body coloured felt for the two pence pieces and the white felt for the penny.
Let's go for it and draw the beak free hand, can you imagine how this diamond shape could turn out to be a beak? You can make it any size you like, small beaks are cute, big beaks are funny.
Cut out all of these shapes.
You should have all of these pieces:
- 5 body pieces
- 2 white inner eye circles
- 2 yellow outer eye circles
- A beak.
Step 3.
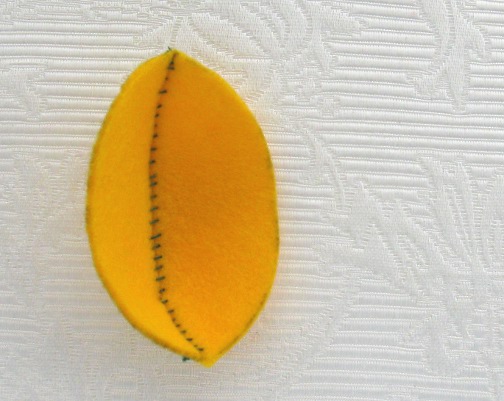
You need to use four of the body pieces for this part. Put two body pieces together like a sandwich with nothing in it. Make two of these like in the picture below.
Sew up one side using over stitch, use doubled thread and make a nice big knot in the end. It needs to be secure as we're going to stuff it.
Use thread that matches your felt unless you want your stitches to stand out like mine.
When you open them out you should have two of these pea pod shaped things. Put one over to one side.
Step 4.
Now take one of the pea pods and nestle the remaining body piece inside it. I've used my paper pattern here to show you as it's difficult to see what I mean.
Line up the edge, just try your best as this bit is tricky. Use a pin to hold it where you want it. Sew up the edge using over stitch again.

When you open it out it should look like mine below.
Step 5.
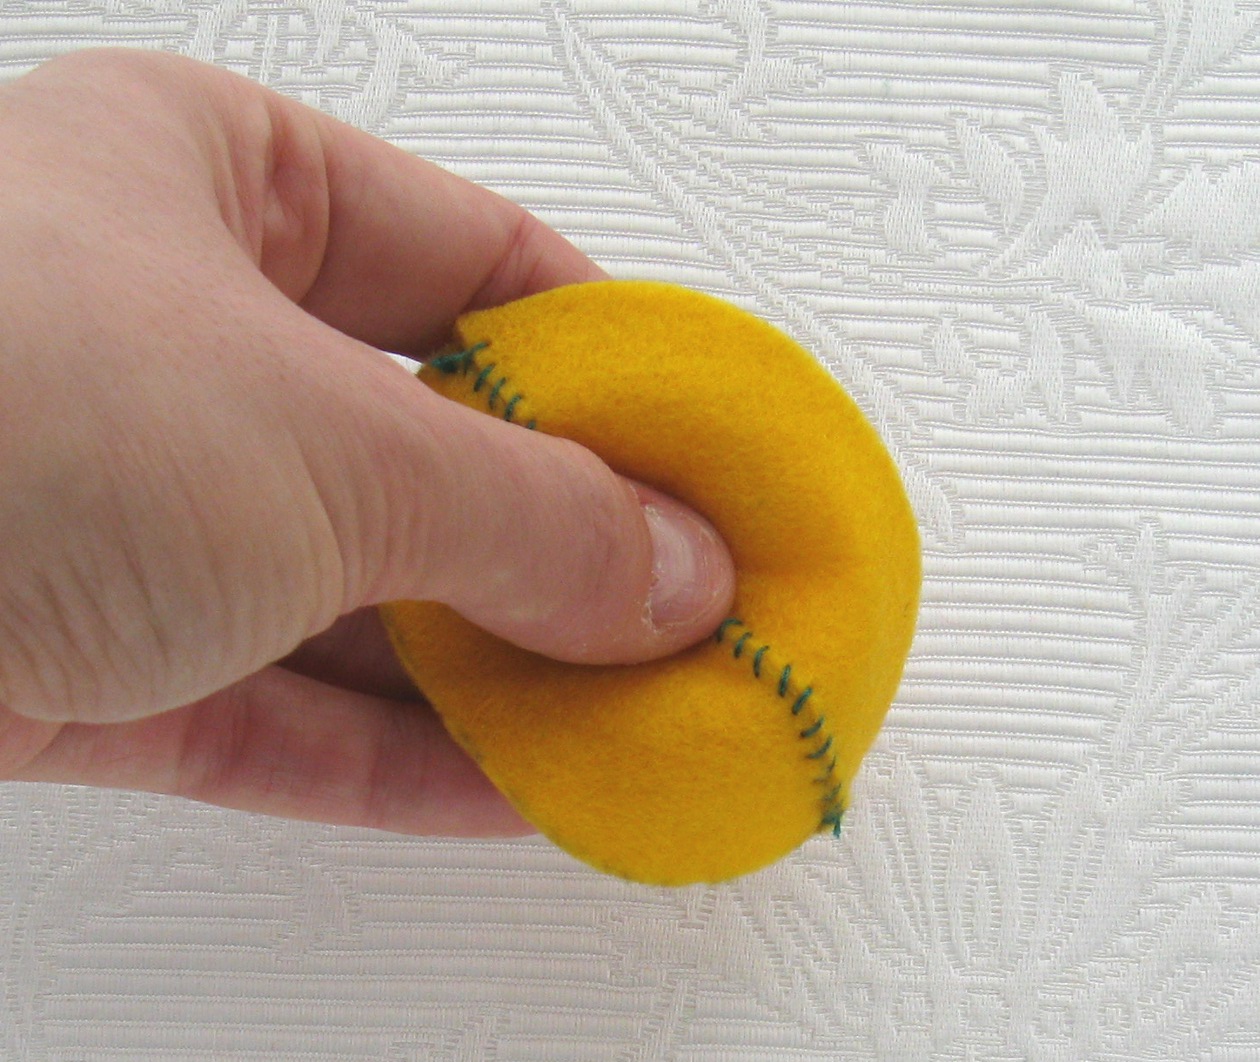
Now you should have one pea pod with two segments and another with three, like in these pictures:
Pick up your two segment pod and squash it, turning it inside out like this:
Your inside out pea pod shaped thing should look pretty much the same as it did before but the nice big knot you made to secure your thread when you sewed it up, that should be on the inside now.
Put the two segment pod inside the three segment pod. I'm going to use lots of pictures as it's another tricky bit.
Push it in.
Line up the two sides, again, just try your best, it takes a while and it's fiddly. Pin the edges to keep them still. This is the hardest part of the whole Chick-a-Dee, if you can do this part the rest is easy.
Sew almost all the way around, I stopped here like in the picture below and tied a good double knot.
Poke your finger in through the hole and open out the body so it looks like this:
Your Chick-a-Dee is inside out at the moment, you need to turn it the right way out. It's just like turning a jumper the right way out so you can wear it properly. Ask for help if you need it. People like to be asked sometimes, it makes them feel useful.
Step 6.
I like stuffing! It's fun. Stuff your Chick-a-Dee until it's full, you might find you need more stuffing than you thought. I usually do.
When it's really full like mine, sew up the hole like I am in the picture below. Hide your starting knot on the inside of the body so it's nice and neat. Sew up the gap pulling the thread so that the hole closes up.
When you get to the end, do a double knot and trim off the thread as close to the knot as you can. If it's a bit messy, it doesn't matter, just turn your Chick-a-Dee upside down, that part can be its bottom!
Roll the completed body ball between your hands and give it a good squeeze, play catch with it for a bit, this helps to even out the stuffing and it's fun too.
Step 7.
Now to add the features.
Fold the diamond shape so that it looks like a beak and pin it to the Chick-a-Dee. Sew the beak on, I found the easiest way for me was to go in the body then out through the beak, you might find a better way. If you want to hide your stitches use thread that matches the beak. Hide your finishing knot underneath.
Next for the eyes.
If you are using teeny seed beads, make sure that your needle and thread will pass through the hole of the bead. You might need to find a bigger bead or a smaller needle.
Go in through the white inner eye circle and pop the bead on like I have below. Pull the thread all the way through then go back down through the felt, just next to the bead and tie a knot on the underside.
You should have two like this. They look surprised to see us!
You can get lots of different looking Chick-a-Dee faces by moving the eyes around. Maybe have a play with them before you decide where they are going to go.
Read the instructions on your glue and ask for help if you need it. Glue on the eyes where you want them.
Looking pretty cute now hey?
The outer eye circles need to have the middle cut out to make a hoop shape, fold them in half and go in like this with the scissors, this is another good time to ask for help and make someone feel useful.
You should end up with them looking like these ones below. Don't worry if they are a bit wobbly, because felt is so great you can pull and push them around until they look how you want them to.
Glue these over the white eye circles like this:
Poke a feather in between the stitches on the top of the head. TaDa! All done!
Selesai dan silahkan beri nama untuk si cantik ini,
Membuat sovenir itu sangat mudah, oh yah apabila Anda seorang yang berjiwa bisnis, hasil karya seperti ini sangat layak untuk di jual loh. Anda bisa berkreasi sendiri panduan disini hanya sedikit memberi contoh saja.
Apa bila ada ada waktu pergilah ke toko souvenir terdekat, lihatlah disana Anda akan menemukan inspirasi untuk membuat souvenir yang di padu dengan kesukaan anda.
Saran dari saya gunakan waktu anda dengan baik dengan memanfaatkan hoby untuk menghasilkan beberapa lembar Rupiah, ikuti panduan disini untuk inspirasi usaha Anda.
Di luar sana banyak sekali yang sukses mengembangkan usaha dengan melihat panduan seperti ini,mereka mempraktekan dengan bahan seadanya dan menjualnya secara offline maupun online.
Seperti sahabat saya di Palembang sdri Dewi telah sukses mengembangkan usaha souvenir online nya.Selamat saya harapkan ada banyak Dewi-dewi lain yang menyusul.Ok lain waktu saya akan memposting tentang keberhasilan Sdri Dewi yang telah berhasil mengembangkan usaha souvenir seperti ini.
Nb; Jika Anda menginginkan banyak tutorial lain sesuai dengan hobby berupa video yang mudah di ikuti silahkan lihat panduan lengkap Klik disini
Semoga bermanfaat.
 Dengan memanfaatkan jaringan internet seperti sekarang produk yang unik ini mampu menjangkau pasar seluruh wilayah Indonesia .
  Dengan memanfaatkan jaringan internet seperti sekarang produk yang unik ini mampu menjangkau pasar seluruh wilayah Indonesia .